House Washing vs. Painting Prep: When Pressure Washing Helps (and When It Hurts)
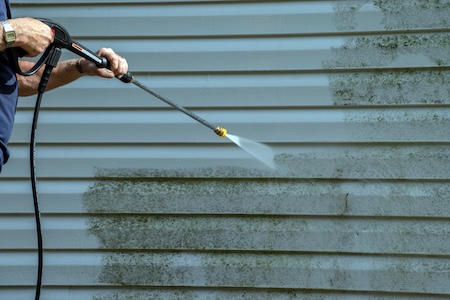
Thinking about new paint for your home in Seattle, WA? Clean siding is the first step to a smooth, long-lasting finish. The key is choosing the right wash method. In many cases, a careful soft wash primes the surface so paint bonds well. In other cases, high pressure can force water behind siding, raise wood grain, or streak oxidized panels. Below, we explain how to tell the difference and why a professional approach matters before you book professional house washing.
Why Clean Before You Paint
Seattle’s cool, wet seasons feed algae, mildew, and moss. In neighborhoods like Ballard, West Seattle, and Rainier Valley, shaded sides of homes often show green growth. Paint does not stick to grime. A thorough wash removes organic growth, pollen, soot, and chalky oxidation so primer can grab the surface. Skipping this step can lead to early peeling even if you buy high-quality paint.
When House Washing Helps Your Paint Job
Used with the right pressure and cleaners, washing creates a paint-ready surface. Here are common times it helps:
- Algae or mildew film on north and east walls, common after long wet spells
- Salt-laced grime from Puget Sound breezes on exposed facades
- Loose dust and chalk on older acrylic paint that needs light removal
- Spider webs, pollen, and soot that block primer from bonding
Soft washing uses lower pressure with the right solution to break down organic growth. A careful rinse leaves a clean, dull surface that takes primer evenly.
When Pressure Washing Can Hurt Painting Prep
High pressure alone is not a cure-all. It can cause damage that shows up under fresh paint. Watch for these red flags:
- Cracked caulk or gaps where water can be driven behind trim
- Weathered wood siding with raised grain that can fuzz under heavy spray
- Oxidized chalk on older aluminum or vinyl that can streak if blasted
- Loose or failing paint where pressure can widen edges and create more scraping later
High pressure on fragile surfaces often creates more prep work. The smarter choice is low pressure, precise rinsing, and hand prep where needed.
Understanding Oxidation Before You Wash
Oxidation is the chalky film you see on aging paint, aluminum, or vinyl. It wipes off as a powder. If you use strong pressure without addressing oxidation, you may leave tiger stripes or uneven sheen. A pro will test for oxidation, choose the right cleaner, allow a set time, and rinse gently so the surface looks even and takes primer well. Ignoring oxidation can telegraph flaws through new paint.
Seattle, WA Factors That Change the Plan
Local weather and building styles shape your prep strategy:
Queen Anne and Capitol Hill have many older wood homes with detailed trim. These often need soft wash, followed by hand-scrub in corners, then careful dry time. Newer fiber cement in areas like South Lake Union handles washing well, but edges and butt joints still need light touch. In winter and early spring, rain stretches dry times, so scheduling matters. Aim for a window with a clear forecast so surfaces fully dry before primer.
Soft Wash vs. High Pressure: Picking the Right Tool
Soft wash relies on targeted solutions and controlled rinsing. It is ideal for painted wood, stucco, and composite siding. High pressure is reserved for tough, non-painted hardscapes, not paint prep. On homes, too much force can lift edges, drive water into sheathing, and mark softer substrates. Match the method to the material, not the mess.
How Pros Prep for Paint After Washing
Washing is step one. After surfaces dry, a pro team will spot-scrape any remaining loose paint, sand edges smooth, check caulk lines, and prime bare areas. Clean, dull, and dry is the goal. The result is a uniform base that helps topcoats lay down evenly and last longer across Seattle’s rainy seasons.
Common Siding Types Around Seattle and What They Need
Every material reacts differently. Here is how washing supports good paint prep without getting in the way:
Painted wood lap siding: Soft wash, targeted rinse, then hand prep. Extra care around window trim and butt joints.
Fiber cement: Gentle wash and rinse. Check factory-primed ends and joints. Avoid forcing water into flashing.
Stucco: Low-pressure rinse with proper cleaner. Watch for hairline cracks that need repair before paint.
Aluminum and vinyl: Address oxidation first. Use low pressure to prevent streaking and distortion.
Signs You Are Ready To Paint After Washing
Fresh paint sticks best to a clean, stable surface. You may be ready if:
- The surface looks even with no chalk transfer when lightly rubbed
- No visible algae or mildew stains remain
- Edges of previous peeling paint are feathered and smooth
- Caulk joints are intact and dry to the touch
If any of these fail, more prep is needed. That might mean a second gentle wash pass, touch-up scraping, sanding, or repairs before priming.
What A Quality House Wash Includes
A complete service is more than a quick spray. Expect a site walk, protection for plants and fixtures, the right cleaner for the surface, gentle application, patient dwell time, and a thorough rinse. Pros take care at entry points, light fixtures, and under-lap areas where water can reach behind. This approach keeps the structure safe and speeds up the next steps in painting.
Timing Your Project In Seattle’s Seasons
Spring and fall bring active growth and frequent rain. Summer is often the sweet spot for washing and paint prep. Still, microclimates vary. West-facing walls in Magnolia may dry faster than shaded slopes in Leschi. A local schedule that respects daylight and dry time helps your coating cure properly. Rushing dry time is a top cause of early paint failure.
Avoid These Painful Paint-Prep Mistakes
Even well-meaning efforts can cause problems. Here are pitfalls that lead to poor results:
Blasting siding to “speed up” prep can open joints and force moisture where you cannot see it. Skipping an oxidation check creates uneven sheen. Washing the day before heavy rain can trap moisture in overlaps. Not protecting landscaping can leave burn spots on delicate plants. A steady, careful process prevents all of these.
How Clean & Smart Power Washing Approaches House Washing For Painting
Our team focuses on results that hold up through Seattle’s wet months. We adjust methods by siding type and exposure, test for oxidation, and time the wash so your surfaces dry fully before primer. If your project calls for a deep clean, we recommend starting with our residential pressure washing services and then confirming paint-readiness with a simple site check.
Want to read more before you start? See our latest insights on the pressure washing tips blog to understand how cleaning supports long-lasting paint.
Where Your Internal Links Fit The Plan
If you are mapping your exterior upgrade, it helps to connect the steps. Many homeowners begin with a gentle clean, schedule repairs, then call painters. When you are ready to clean, our house washing service is built to prepare surfaces for primer, not just make them look bright for a day. To explore more services that pair with paint prep, skim our residential pressure washing services overview and plan the full exterior refresh.
Choosing A Local Team You Can Trust
Beyond equipment, local know-how matters. Seattle’s mix of vintage bungalows and newer infill homes means details change street by street. Look for a company that explains the wash method, confirms dry times, and communicates what will happen at trim, vents, and joints. Clear photos and a simple plan build confidence before any work begins.
Ready To Protect Your New Paint?
A smart wash sets the stage for a smooth, durable finish. If your home needs a care-first clean before painting, start with our house washing service. You can also learn more about house washing in Seattle, WA with Clean & Smart Power Washing, or call us at 206-673-0001 to schedule a visit at a time that fits your project timeline.
Don’t Wait! Start Your Pressure Washing Projectswith Clean & Smart Power Washing in Seattle!